
Updated
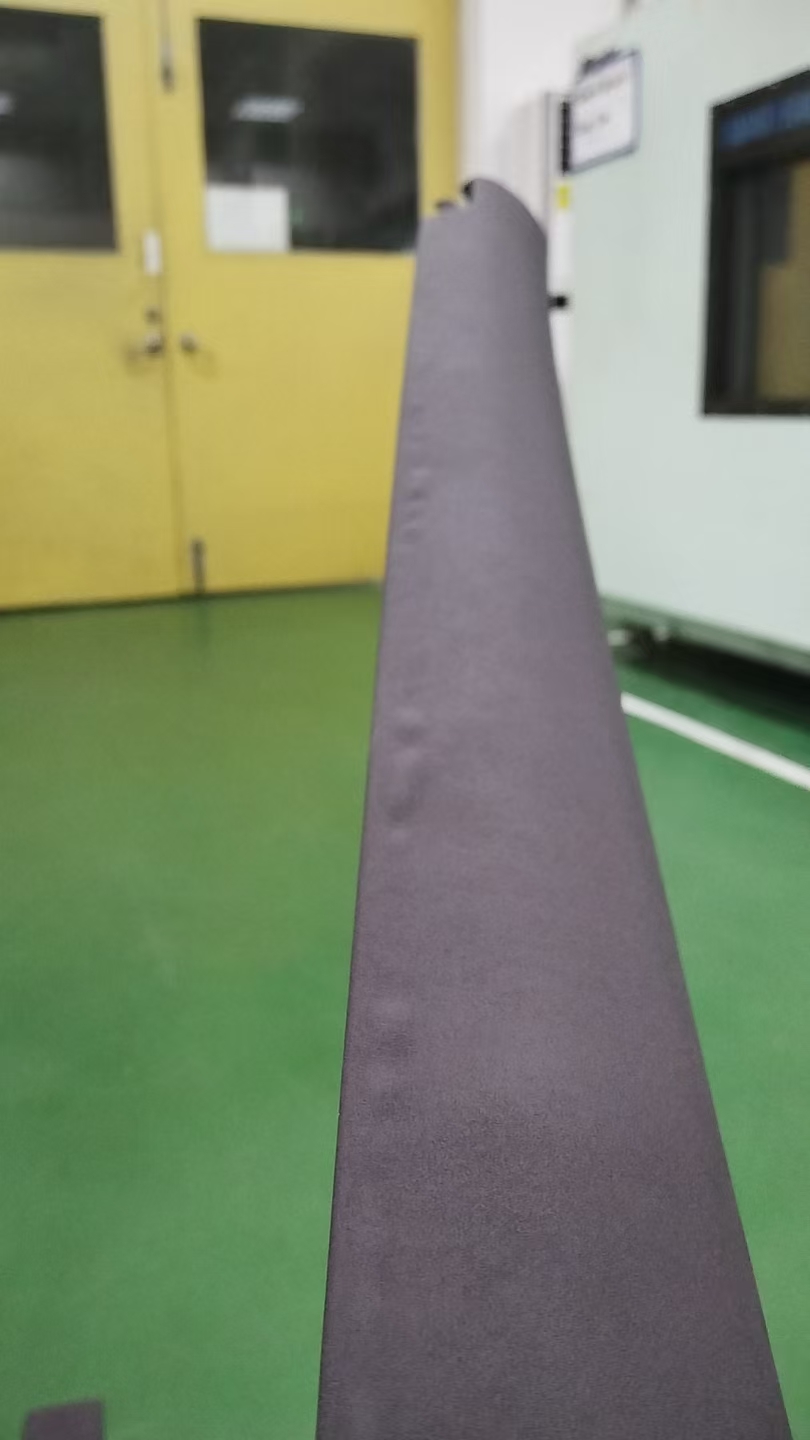
The blister appeared before formal mass production.
In an automotive door-trim wrapping project, parts were conditioned for 72 hours after wrapping and then exposed to 100°C for four hours. After the heat test, the skin showed blistering and the peel performance of the relevant skin combination was also abnormal.
That is a problem in a developing project. It also shows why development testing matters: a trial can reveal a problem while materials and processes can still be adjusted. The team can retain the parts and data, then complete the correction before release.
R-5670 and R-60C were used throughout this project's validation. From finding the blister and cross-testing materials to reporting to the component supplier and vehicle manufacturer, changing the skin and confirming the result, the work followed RELANET's eight project development steps.
The eight steps define the input and deliverable at each stage and where a project must return when a result falls short. Projects involving a vehicle manufacturer and a component supplier need a clear path like this.
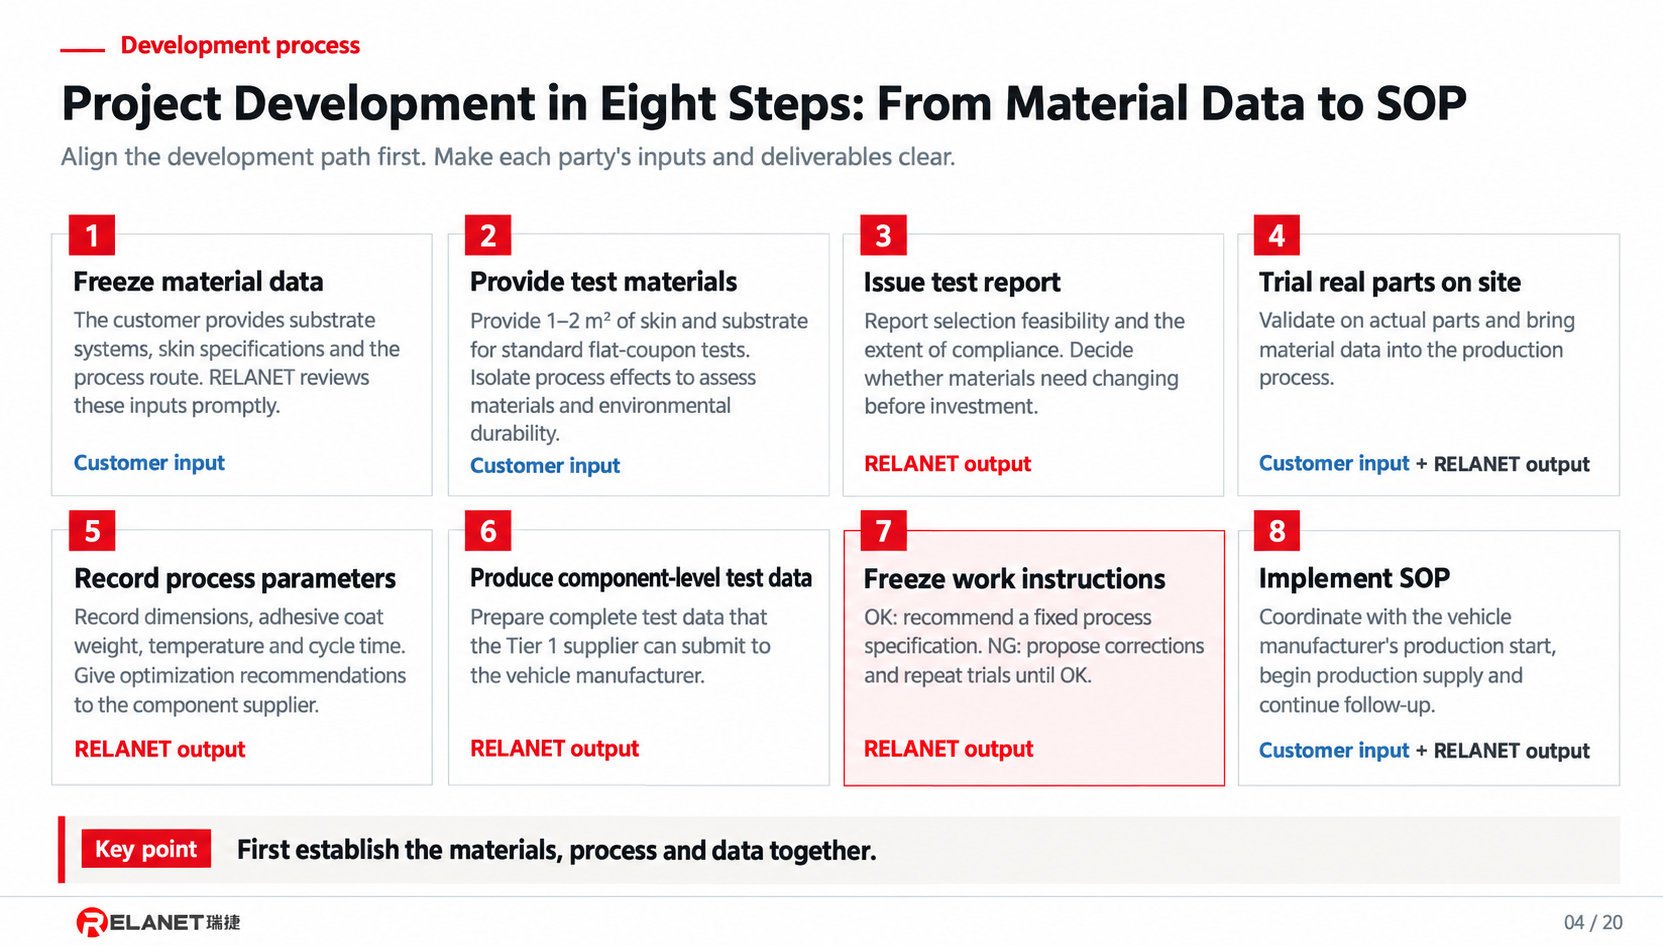
- 1 Freeze material data; 2 Provide test materials; 3 Issue test report; 4 Trial real parts on site.
- 5 Record process parameters; 6 Produce component-level data; 7 Freeze work instructions; 8 Implement SOP.
- A failed result returns to correction and further testing; no release before the agreed requirements are met.
Define the materials and requirements
The eight steps begin by clarifying the materials and requirements.
Step 1, 'freeze material data', means confirming the technical inputs. The customer supplies the substrate system, skin specification and process route. RELANET reviews these inputs and aligns the material combinations and target requirements to be tested with the project team.
Step 2, 'provide test materials', brings the actual skin and substrate into the laboratory. Standard flat coupons reveal how the material combination behaves. Careful work at the start provides a traceable baseline when an issue appears later.
Here, the original skin was PVC with a fabric layer. Adhesive selection had to be judged on that actual skin, its spacer material and the specific substrate. A common skin name could not replace testing of the supplied materials.
This is also the focus of RELANET's automotive-interior development and technical support. Material selection starts with the customer's part requirements; the test results must then be usable by process, quality and project teams.
Record the defect and compare materials
At Step 3, 'issue a test report', abnormalities must be documented honestly.
After the first blister, the team treated it as an open development issue and performed a cross-test: the original and reference PVC skins, 3D Mesh spacer fabrics from different sources, and two adhesive-application levels on the Mesh side. Two PVC types, two Mesh types and two coat weights made eight combinations.
The comparison moved the discussion from where the blister appeared to which material combinations were more susceptible. Peel results differed when the PVC skin variable changed, so the skin material became a priority for further investigation and correction.
The adhesive system remained R-5670 two-component water-based polyurethane adhesive with R-60C curing agent throughout. Recording material origins, combinations and coating conditions allowed each new trial to build on the previous result.
For automotive-interior wrapping, R-5670 with R-60C is designed to balance early strength after lamination and final strength after conditioning. Early strength informs part holding and transfer; final strength concerns the conditioned bond. Both stages require separate validation.
RELANET's published company test results for R-5670 give quantitative references for these two stages.
| Early strength | Final-strength reference |
|---|---|
| One minute after joining; average 25 N/25 mm | After seven days of conditioning; approximately 60 N/25 mm |
| Early holding and transfer | Bonding performance after conditioning |
The cited R-5670/R-60C reference test used a PVC + knitted-fabric composite bonded to flame-treated PP, 25 mm specimen width, 180° reverse peel and 200 mm/min speed. The seven-day result was measured at 23°C ± 5°C. These figures come from a separate published product test; the skin-change retest in this case was judged against its own report and project requirements. Published reference test →
The component supplier can use early-strength data to plan holding, handling and transfer after lamination, and final-strength data to assess the bond after conditioning. RELANET incorporated both stages in development and continued checking the actual part's heat, humidity and wrapping requirements so material performance matched the production process and part specification.
Report the findings and revise the skin
The report then had to reach everyone who could advance the change.
The initial blistering, cross-test results and proposed material adjustment were reported to the component supplier and vehicle manufacturer. The supplier needed to coordinate the skin supplier and production process; the manufacturer needed to understand the effect on part requirements and how the correction would be tested.
The customer arranged an investigation by the skin supplier and moved forward with a skin-construction change. The original PVC + fabric became a four-layer PVC + fabric + foam + fabric composite. The change created a defined material to test and a clear question for the next trial.
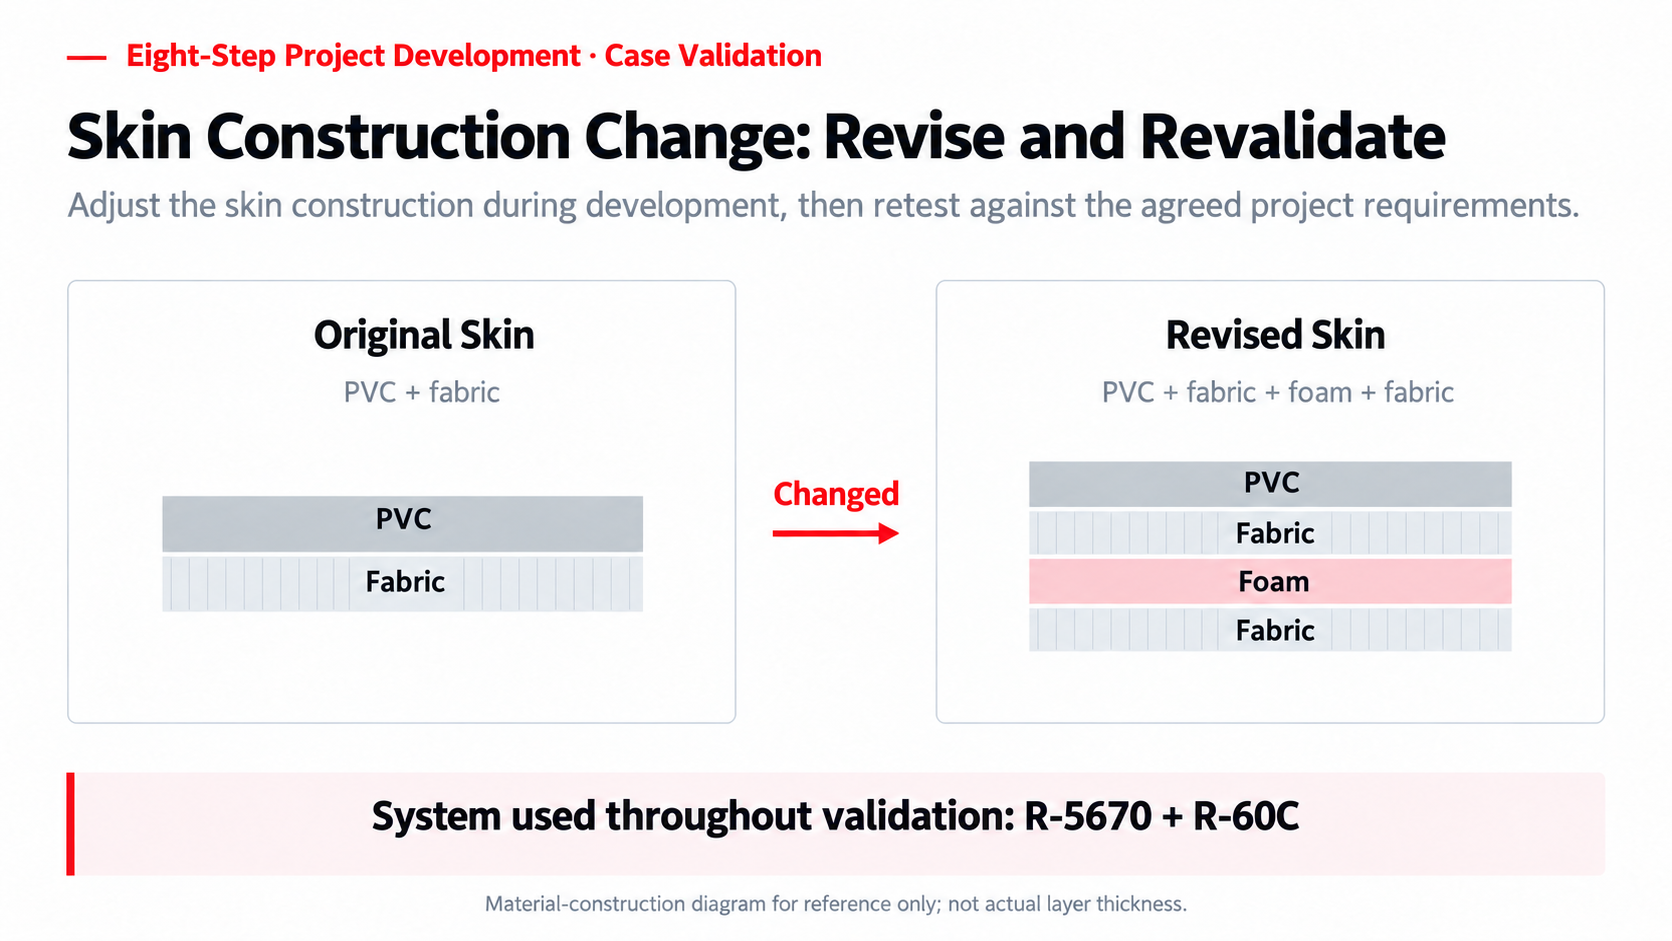
- Original skin: PVC + fabric. Revised skin: PVC + fabric + foam + fabric.
- The graphic shows the material-construction change, not actual layer thickness or the failure location; R-5670 + R-60C was used throughout the comparison.
After the skin change, the project retest met the agreed requirements. That addressed the material-combination issue and supported further production preparation. This result belongs to this project's material and process combination; a different skin or part still requires its own validation.
Transfer the solution to real parts
The eight steps do not end with a laboratory report.
Step 4, 'trial the product on site', transfers the laboratory material solution to a real part and process. Results from flat coupons must be checked on the actual shape, wrapping method and shop-floor conditions. After a skin change, the site trial must use the revised material combination.
Step 5, 'record process parameters', preserves the conditions of the site trial. Dimensions, adhesive coat weight, temperature and cycle time inform later process control. The team must know under which conditions a part was made and be able to repeat them.
Early-tack observations in this project also supported process decisions. R-5670's performance at different times after joining must be matched to handling, trimming and edge-wrapping operations. Final strength after conditioning is assessed alongside component testing. Recording time points, site settings and test results creates traceable development evidence.
Step 6, 'produce component-level test data', advances validation to the actual part and gives the supplier information for the manufacturer's review. The skin and process before and after the change, the tests completed and the decision against agreed requirements must all be traceable.
This sequence gives the supplier more than one set of laboratory numbers: it yields technical documents that support project progress and production decisions. RELANET contributes material validation, process recommendations and test records while resolving development issues with the customer.
Fix the work instructions and release criteria
Step 7, 'freeze the work instructions', is especially important.
If the requirements are met, freeze the tested material combination and process conditions in work instructions and process recommendations. If they are not met, propose a correction and repeat site trials and tests until they are. A revised skin requires corresponding updates to instructions and records so production follows one verified method.
Only Step 8 is 'SOP implementation', or the start of mass production. Complete the agreed tests and release under the manufacturer's and supplier's project schedule before supplying production, and continue monitoring use on site.
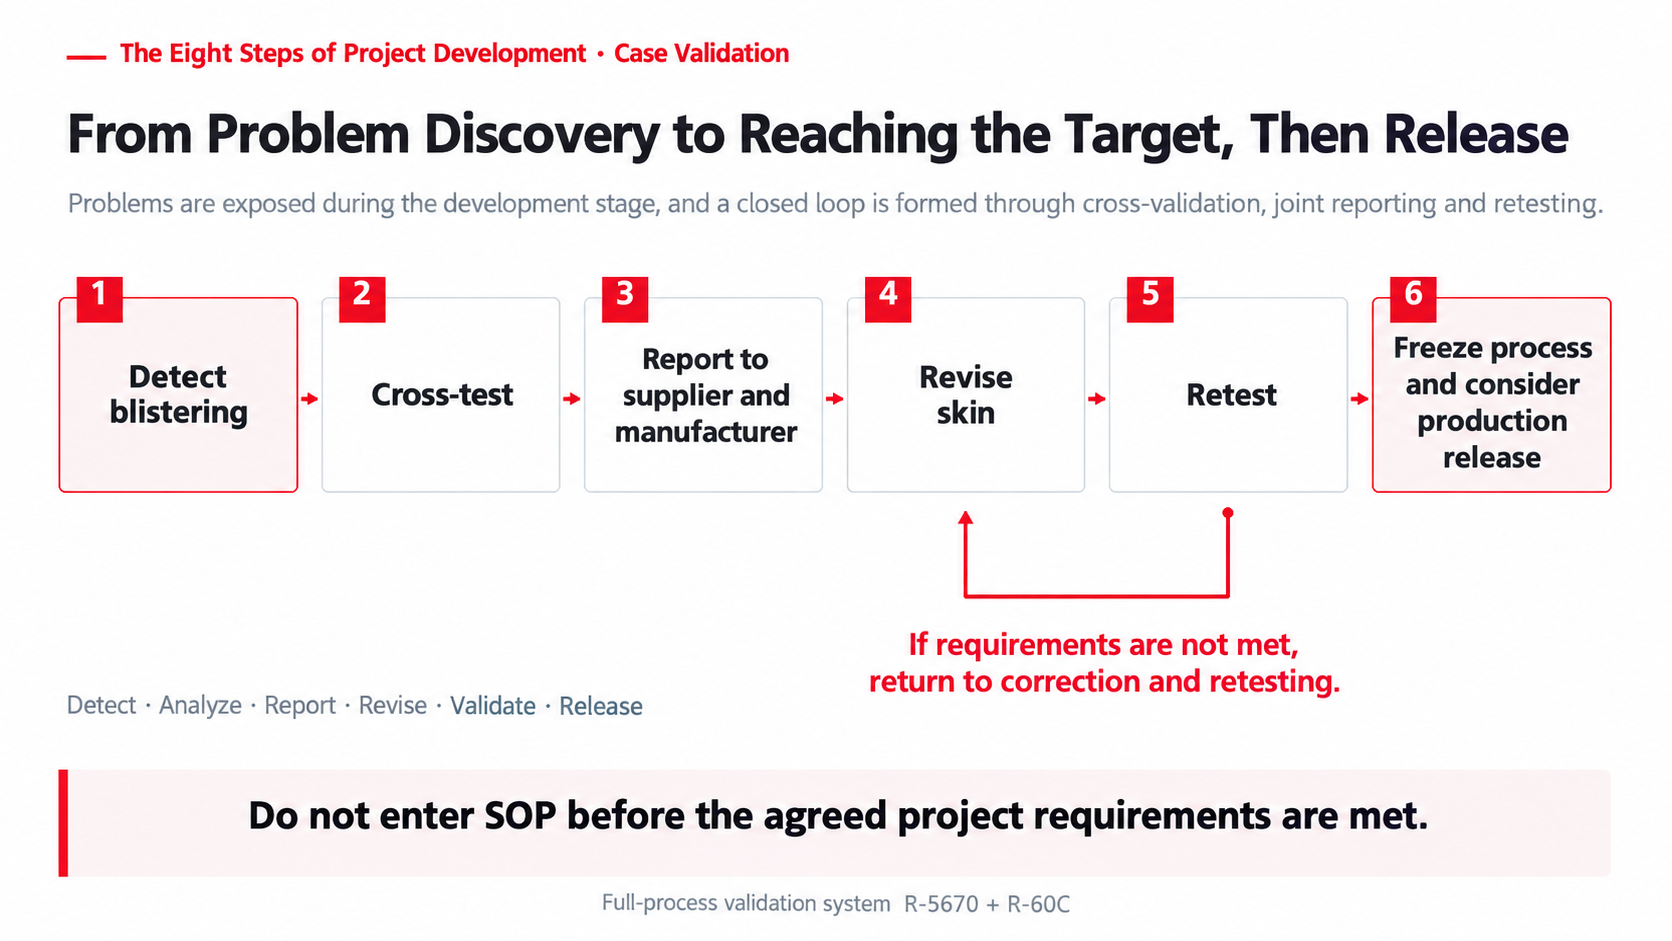
- Detect blistering → cross-test → report to supplier and manufacturer → revise skin → retest → freeze process and consider production release.
- If requirements are not met, return to correction and retesting; the diagram does not establish that this case has already reached SOP.
Resolve the issue before production
For RELANET, supporting vehicle manufacturers and component suppliers means doing this practical work: provide usable laboratory reports, retain executable site settings, link component validation to project requirements and make production operations repeat the conditions already verified.
Our production principle is clear: a solution that does not meet the project's agreed requirements is not released or introduced into formal mass production. Applying that rule during testing, correction, retesting and release prevents nonconforming solutions from reaching the market.
Looking back, the blister triggered timely cross-testing and coordination, followed by a new skin and retesting. R-5670 with R-60C stayed in the validation system, and the eight steps required records and evidence at each stage. The issue was resolved during development; formal production should follow only after the required standard is met.