
When blistering or debonding occurs after wrapping a door panel or instrument panel, first establish when and where the defect appears. Then peel open a local sample to determine whether failure is at a bond interface, within the adhesive layer, or in the foam or backing. Residual moisture, surface contamination, uneven adhesive application, insufficient activation, trapped air during bonding, and springback or insufficient conditioning after demolding all need to be considered. Defects that look similar may require very different corrective actions.
This article uses the RELANET R-5670 and R-60C two-component waterborne polyurethane adhesive system as an example to explain how to troubleshoot door panel and instrument panel wrapping. The process checks below are engineering guidance. The specific root cause must be confirmed using defective parts, production records, and controlled comparison tests.
Identify the defect first: distinguish blisters, lifted edges, and material delamination
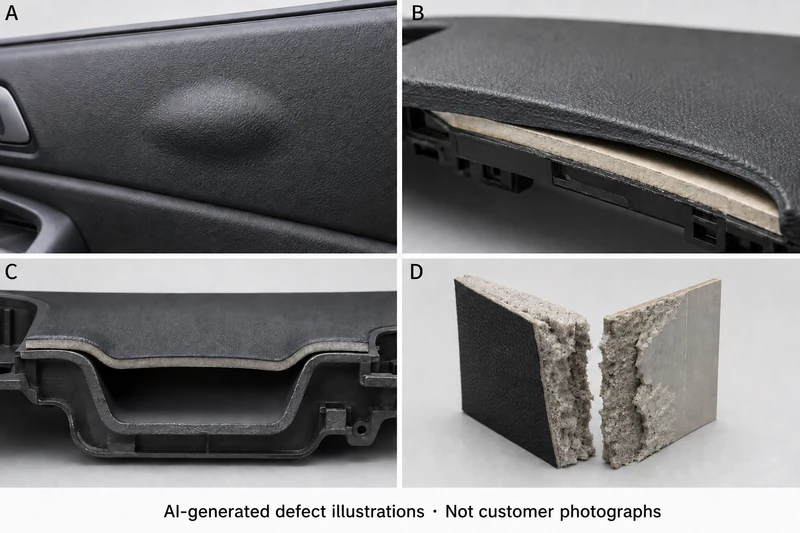
Figure 1. AI-generated defect illustrations, not customer photographs or R-5670 test results. Layer thicknesses and defect dimensions are not to scale. The images illustrate appearance only and cannot establish a root cause.
A · Localized blistering
Record whether the blister appears at demolding or only after storage or heating. Check for incomplete local contact, trapped air, residual moisture, or separation between layers.
B · Edge debonding
Check whether lifting is concentrated at wrapped edges, corners, or highly stretched areas. Review effective contact, pressure-hold conditions, demolding temperature, and skin springback.
C · Bridging over a recess
The skin spans the recess without contacting its base. Check preforming, material elongation, venting paths, and contact with the tool.
D · Cohesive foam failure
If foam remains on both surfaces after peeling, investigate the foam itself and the existing laminate, as well as the newly applied adhesive layer.
More than one failure mode can occur on the same part. When taking samples, retain the defect center, its edge, and an adjacent sound area. Photograph matching locations on both peeled surfaces.
When the defect appears | First clues to investigate | Records to retain |
|---|---|---|
Immediately after bonding or demolding | Insufficient activation, cooling during transfer, inadequate local compression, restricted venting, immediate springback | Temperature near the adhesive layer, transfer time, pressure or vacuum curves, and the condition at demolding |
Gradually after storage | A mismatch between adhesive strength development and residual stress, or moisture or interlayer issues | Mixing time, conditioning temperature and humidity, and the location and rate of defect growth |
After heat, damp heat, or cycling | Heat resistance under sustained load, environmental durability, material shrinkage, and compatibility between layers | Test conditions, loading arrangement, and peel results and failure modes before and after aging |
Which R-5670 characteristics matter during troubleshooting?
R-5670 is RELANET's two-component waterborne polyurethane adhesive for automotive interior lamination, used with the blue R-60C hardener. The available product information identifies rapid initial strength development as a product characteristic. Listed application materials include PVC, ABS, PP, 3D Mesh, velour fabric, and nonwovens, for interior applications such as door panels and instrument panels. Even when the material designation is unchanged, back coatings, foam layers, surface treatments, and batch differences still need to be checked. Product information
Product reference item | Value in the available information | How to use it when troubleshooting |
|---|---|---|
Base adhesive and hardener | R-5670 + R-60C | Verify grades, batches, and storage condition to avoid using the wrong hardener |
Mixing ratio | 100:5 by mass | Weigh accurately at a mass ratio of 100:5; do not adjust the hardener amount arbitrarily on the production line |
Use time after mixing | Use within 8 hours at 23°C | Start timing when mixing begins; the usable window at other temperatures requires separate confirmation |
Base adhesive solids content | Approximately 47%–50% | Distinguish wet coat weight from dry adhesive coat weight and assess the actual water-removal load |
Typical initial peel force | Approximately 25 N/25 mm, measured 1 minute after bonding | Use this to understand initial strength development, not as a guaranteed minimum for every material |
These reference values come from RELANET's available product page. Check the latest technical data sheet (TDS) and the project process specification before use. The typical initial peel value depends on the materials, sample preparation, and test conditions. It does not replace whole-part heat, damp-heat, cycling, or creep validation.
For wrapped parts, initial strength helps resist springback, handling, and transfer stresses after bonding. However, a good peel result at one point in time does not establish that highly stretched edges and corners are stable or that the part has passed durability testing. Waterborne systems also require verification of water removal, film formation, and crosslinking conditions.
The R-5670 product information refers to low-VOC and low-odor manufacturing. This does not mean zero VOC and does not replace part-level odor, emissions, or fogging tests. The upper service-temperature limit, conditioning time, and spray-application window need to be confirmed against the latest TDS and project conditions.
After peeling a sample, locate the failure plane
Bond strength involves both adhesion between the adhesive and the substrate and the cohesive strength of the adhesive itself. On an actual part, failure may occur first in the foam, backing, or an existing laminate. 3M: adhesive and cohesive strength
What the peeled surfaces show | Initial direction of investigation | What to check next |
|---|---|---|
One side is largely bare; most adhesive remains on the other | Inadequate adhesion or effective contact at the corresponding interface | Contamination, back coating, surface treatment, wetting, and local contact during bonding |
Adhesive remains on both sides, with failure mainly within the adhesive layer | Cohesive adhesive failure or mixed failure | Ratio, mixing, drying, conditioning, and test timing; residue alone does not establish that too little hardener was added |
Foam fragments, fibers, or backing residue remain on both sides | Failure of the material itself or the existing laminate | Compare with unprocessed material; check material strength, thermal history, and durability of the original laminate |
Residue varies greatly across the area, or a thin adhesive layer is difficult to distinguish | Possible mixed failure | Examine under magnification and record each area separately; use cross-section analysis if needed, rather than judging by feel alone |
Statements such as “it cannot be pulled apart” or “the material tears” need to be interpreted in light of the test conditions. Material failure only shows that a particular material layer failed first in that test. It does not independently prove that every bond interface meets the project requirements. Likewise, an absence of stringing during a hand peel should not automatically be interpreted as poor adhesion. Stringing mainly reflects the rheological and tensile response at that moment; it cannot replace a peel test performed by a specified method.
Follow the production sequence without changing every parameter at once
1. Surface condition: which layer does the adhesive actually contact?
Check PP, ABS, and other carriers for mold-release agents, oil, dust, and storage conditions after treatment. Also check the reverse side of PVC skins for back coatings, slip additives, or other laminated layers. Plasticizers in some plastics may migrate and affect long-term bonding, so validation should cover the actual formulation and environmental aging. 3M: substrates and adhesion
If flame treatment, plasma treatment, or primer is used, check equipment condition, treatment coverage, and the interval between treatment and adhesive application. Surface-energy or wetting checks can support process monitoring, but they do not replace final bond testing. First confirm that the cleaning and treatment methods will not damage the substrate or back coating.
2. Mixing and usable time: record weighing, mixing, and timing
When using R-5670 + R-60C, verify the actual weighed amounts of base adhesive and hardener. Mix according to the approved process and record both the mixing start time and the use-by time. The blue hardener helps show whether distribution is uniform, but uniform color does not prove that the ratio is correct.
Adhesive that still flows or can still be sprayed is not necessarily within its usable window. Do not reset the use time by topping up an old mixture with fresh adhesive, and do not increase the hardener level simply because blistering or debonding has occurred. First determine whether the problem involves mixing, drying, or inadequate contact, then carry out a controlled ratio comparison where appropriate.
3. Coat weight and drying: check adhesive coverage and water removal separately
Insufficient adhesive, missed areas, or absorption into a porous backing may leave the actual bonding surface without a continuous adhesive layer. Local adhesive buildup increases the water-removal load. Applying more adhesive does not necessarily increase bond strength.
Use witness coupons from the same batch to record mass before and after adhesive application, together with the coated area. Review drying conditions alongside the temperature in each dryer zone, airflow, moisture exhaust, line speed, and ambient humidity. Mass changes measured by a consistent method can help with comparisons, but neither a single weighing nor a surface that feels non-tacky to the touch proves that the adhesive layer is completely dry.
Moisture or volatiles trapped between layers may contribute to blistering when heated. Trapped air and interlayer separation can produce similar appearances. Retain a baseline made with the original process and compare altered drying conditions within the material's allowable limits, while also checking coat weight and contact during forming.
4. Activation and transfer: measure the actual temperature near the adhesive layer
Heat activation must bring the dried adhesive layer into a state suitable for bonding. Public technical information on waterborne polyurethane systems also treats activation of the dry adhesive layer as a separate step. Process windows differ between systems; temperatures specified for another product cannot be transferred to the R-5670 process. Covestro: Dispercoll U 70 technical information
The oven setpoint, infrared equipment power, and skin surface temperature do not directly represent the adhesive-layer temperature at the moment of bonding. Use a validated temperature-measurement method to compare flat areas, recesses, edges, and corners. Record the time between leaving the heating zone and mold closure. When using infrared measurements, account for emissivity and viewing position.
5. Forming and venting: machine pressure does not establish contact everywhere
For vacuum wrapping, check seals, vacuum buildup, blocked channels, and local venting. For press forming, check tool fit, the condition of the press head or flexible pad, pressure distribution, and hold time. Bridging over a recess also calls for checks of preforming, stretch distribution, and changes in skin thickness.
Use a validated contact-imprint or pressure-distribution check to locate areas of poor contact at edges and corners. Comparing sound and defective locations provides more diagnostic value than reviewing the machine's overall pressure alone.
6. Demolding, cooling, and conditioning: check whether springback opens the bond
If defects are concentrated at wrapped edges or highly stretched areas, compare demolding temperatures, pressure-hold or cooling conditions, and support after demolding. Skin shrinkage, foam rebound, and assembly stresses may open a local interface before sufficient adhesive strength has developed.
Record the actual time to the next process step and the conditioning temperature and humidity. Assess performance initially, after the specified conditioning period, and after environmental testing. Do not confuse the instruction to use the mixture within 8 hours with the time required for final cure.
Use a flowchart to organize troubleshooting on the production floor
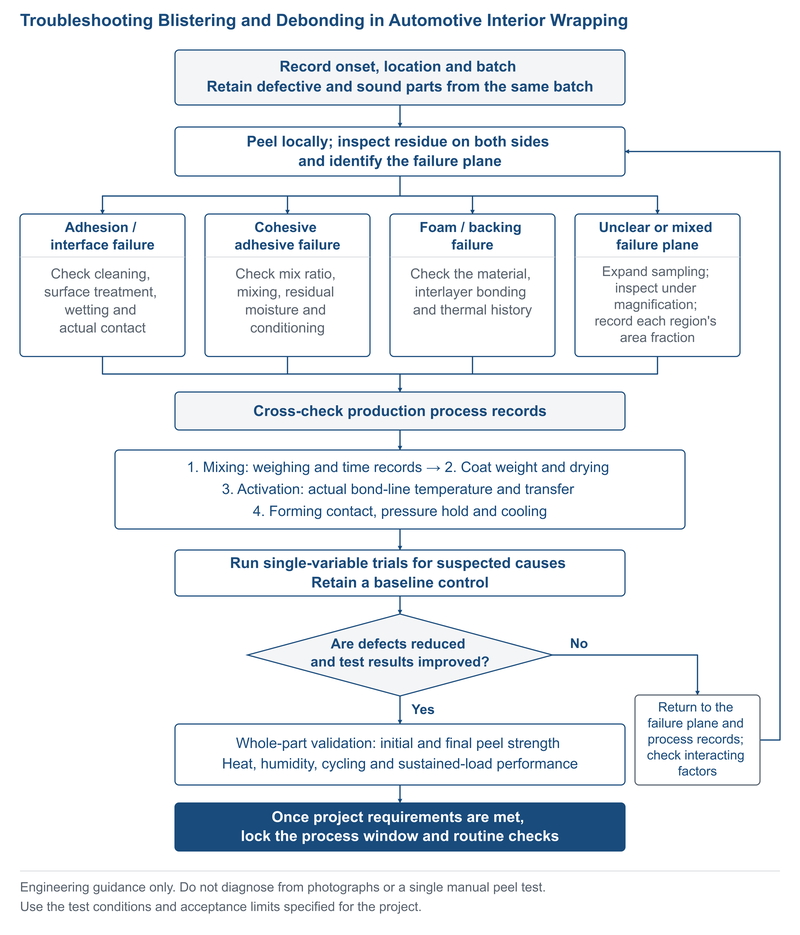
Figure 2. Troubleshooting flow for door panel and instrument panel wrapping. The sequence is engineering guidance; test conditions and acceptance limits follow the project requirements.
Sequence: record the defect and batch → identify the failure plane → check materials, interfaces, and the production process → test the suspected factors through controlled comparisons → verify whole-part performance → document effective conditions in the process specification. If there is no improvement, return to the original evidence and check whether sampling is representative and whether several factors have changed at the same time.
How can you demonstrate that corrective action is effective?
For initial troubleshooting, retain a group made with the original process as a baseline and change only one suspected factor at a time, such as drying conditions, transfer time, or local pressure-hold conditions. Keep the substrate batch, adhesive batch, sampling location, and test method as consistent as possible. If interactions between factors emerge, design a combined-factor experiment.
Validation level | What to observe | How to use the results |
|---|---|---|
Coupon comparison | Peel force, failure mode, adhesive coverage, and result variability | Decide whether the suspected factor warrants further validation; this alone does not establish that the production problem is resolved |
Whole-part confirmation | Blister locations, lifted-edge length, conformity to recesses, springback, and appearance | Confirm whether the improvement on flat coupons also applies to the actual geometry and loading |
Project durability testing | Performance after specified conditioning and under heat, damp heat, thermal cycling, and sustained load | Assess against the customer's specified methods and acceptance limits |
Peel-test records should state at least the strip width, peel angle, speed, sampling direction, test timing, temperature and humidity, number of replicates, and whether the reported result is a mean or peak force. Results from different methods cannot be compared directly. Finally, confirm that the corrective action has not introduced indentations, changes to the skin grain, color differences, or other material damage.
When asking the material supplier to assist with troubleshooting, provide defective parts and sound parts from the same batch, the material stack, adhesive and hardener batch details, mixing records, coat weight, drying and activation temperature records, forming curves, conditioning conditions, and the target acceptance requirements. These records help locate the problem in a specific material or process step.
Frequently asked questions
Does blistering after door panel wrapping always mean that the adhesive is defective?
No. Appearance alone is not enough to make that judgment. Incomplete local contact, trapped air, residual moisture, skin springback, or separation within an existing laminate can all produce a raised area. First record when the defect appears, then examine the failure plane and compare it with sound parts from the same batch and the process records.
Why can edges and corners still debond when R-5670 has high initial peel force?
Edge and corner stability also depends on effective contact, temperature during bonding, local stretching, pressure-hold conditions, and the condition at demolding. The product reference of approximately 25 N/25 mm, measured 1 minute after bonding, is a typical value under specific conditions. It does not replace validation of the actual edge and corner geometry and loading conditions.
Will a higher dryer temperature or more adhesive solve blistering?
The cause needs to be established first. If coat weight is already excessive, adding more adhesive may increase the water-removal load. If the defect comes from bridging over a recess, raising the temperature may not improve contact. Run controlled comparisons within the material's allowable limits, while checking actual temperatures, moisture exhaust, and coat-weight distribution.
Does adding more R-60C improve bonding?
That conclusion cannot be assumed. The available R-5670 product information lists a mass ratio of 100:5. Production should follow the latest TDS and the project-approved ratio. The hardener ratio cannot compensate for surface contamination, missed adhesive, or incomplete local contact. Locate the problem before making an adjustment.
Can an absence of stringing during hand peeling, or torn foam, establish that the bond passes?
Neither is sufficient on its own. An absence of stringing does not replace a peel test, and foam failure only shows that the foam failed first under those test conditions. Strength, failure mode, and whole-part appearance still need to be checked after specified conditioning and environmental testing, using the project methods.
Sources and scope of use
R-5670 parameters and product characteristics are based on RELANET's available product information. Application must follow the latest TDS, the project process specification, and customer requirements. The external sources below explain bonding principles and troubleshooting approaches only. They do not establish that R-5670 contains a particular raw material, nor do they imply endorsement of this product by another supplier.
- RELANET: R-5670 product information: product grade, companion hardener, reference parameters, and application scope.
- 3M: Adhesive Bond Strength: the basic distinctions between interfacial adhesion, adhesive cohesion, and wetting.
- 3M: Substrates and Adhesion: the effects of surface condition, coatings, and plasticizer migration on bonding.
- Covestro: Dispercoll U 70: heat activation of dry adhesive layers in waterborne polyurethane systems; its processing values cannot be used directly to set the R-5670 process.